Showing posts with label workshop. Show all posts

Wednesday, April 13, 2011

Woodturning Baby Gifts

We're at that stage in life where all of our friends have been having babies for a while. In the last couple of years, since I've gotten into woodturning, it has been a lot of fun to give baby rattles on these occasions.

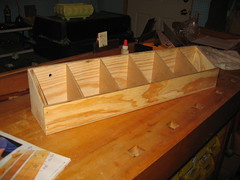
This is the second type of rattle that I've made. Step by step, here's how you do it. (1) cut two pieces of maple and one piece of walnut to identical size. I think these are about 2.75" x 6". (2) using a forstner bit, drill a biggish hole all the way through the walnut at both ends. I used one of the maple pieces as a backstop for the drilling, because it helps me line up the pieces during gluing (3) glue the drilled walnut to one piece of maple and fill the voids with some popcorn kernals (4) glue the other piece of maple to cover the corn-filled holes, clamp and let dry overnight.

The picture above is what you end up with after step 4. Sorry I don't have pictures of the first steps.

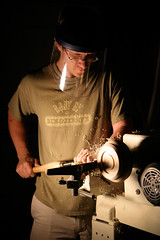
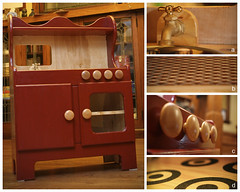
5) After mounting on the lathe and applying the roughing gouge, we have a cylinder.

(6) I mark out the high and low points with pencil before cutting to shape with a bowl gouge. Two of those marks remain in the picture below.

(7) First using a round-nosed scraper, and then 120, 220, and 400-grit sandpaper, I refined the shape of the rattle.

(8) (unpictured) turn the piece off of the lathe. That means you remove material until there is just a tiny bit holding it on each side and then take the last bit from the drive side and catch it as it falls.

(9) after sanding the evidence of mounting off of the ends, I put a few coats of mineral oil and beeswax on the rattle.


Thursday, October 02, 2008

More Free Woodturning Videos

Periodically, I search youtube.com for woodturning videos.  I sort the results by "date added" to see what's new.  I would estimate that for the last couple years, the rate of new woodturning videos on youtube was about 3/week.  Imagine my surprise and glee when I looked tonight (after enjoying the VP debate) to see more than 220 new woodturning videos added in the last week.

Thanks to whoever is posting these videos.

Wednesday, May 14, 2008

Woodturning #7: Oak Bowl


IMG_6876.jpg
Originally uploaded by ..Sally..
I turned this bowl, my largest thusfar, out of oak cut from a friend's father's house (the same friend that gave me the cherry logs). I started turning the bowl on Saturday afternoon, and was in a rush to finish it before heading out to dinner that evening. In my rush, I was too aggressive on the first hollowing cuts and caught my blade in the wood. The resulting "catch" knocked the bowl from the lathe and chipped the base. Deflated, I set the wood aside, swept up the mountain of shavings, and went to the dinner.

Woodturning is such an addicting activity that I replayed that moment of catastrophe several times in my head at dinner. Sorry if I seemed distracted. When we got home around 10:30, I remounted the bowl, turned off the chipped wood to create a new base, and still ended up with a bigger bowl than I'd ever turned before.

I'm told that my dad used to say he enjoyed woodworking because the medium was so forgiving. He had spent years as a pre-stressed concrete engineer, so he was used to mistakes being literally set in stone. Woodturning is possibly the most forgiving among woodworking disciplines. As long as there's a way to remount the wood and get it spinning, something interesting can happen.

There is a life lesson here. After a mistake, find a way to remount and keep turning; redemption is attainable through diligence. And don't be in such a damn hurry before dinner.

Tuesday, April 29, 2008

Sawhorse


IMG_0389.jpg
Originally uploaded by ..Sally..
I’ve posted my woodworking attempts before, but here’s something I did not make. My dad made a set of sawhorses before I was born, and on a recent trip home, I pulled them off of the wall to measure and photograph them. They’re sturdy, strong, and longwearing. I can’t wait to reproduce a set. My dad was fifty-one when he died, and I was eight. Things like this are as close as I’ve ever gotten to interacting with him as an adult.

Friday, April 18, 2008

Woodturning #6: Elm Bowl


Elm Bowl
Originally uploaded by ..Sally..
Last summer, there were a number of elm trees removed from our block. Here's a bowl that I turned from that wood back then. It's been sitting in my garage all winter, drying and taking on a pretty extreme oblong shape. I went ahead and finished it last night.

Monday, April 07, 2008

German Fine Tools Catalog

The Dick Fine Tools Catalog is pure joy.  I signed up for this free handtool catalog online, and didn't know what I was getting.  When it arrived today, Francis chose it for her bedtime story, and we discovered the poetry of Steel.  Listen, as the catalog spreads the gospel of the sharp edge:
Hand sharpening provides you with insight into the inner life of the steel, its structure, quality and the forging process itself.  Your fingertips gauge the interaction between the stone and the steel and the sounds produced reveal whether the two are in harmony.  Patience and concentration are rewarded with cutting edges of unsurpassed sharpness.  Sharpening is a dance with perfection, a challenge for the senses, not to mention fun.
There is wisdom here; not just in helpful exposition (for example, the difference between Western and Japanese chisels), but in timeless prose on the nature of man and his tools.

Check out this amazing virtual version of the catalog.

Saturday, April 05, 2008

Woodturning #5: Cherry Bowl


cherry bowl
Originally uploaded by ..Sally..
A couple months ago, a neighbor asked me if I wanted any wood from two trees cut from his father's yard. He dropped off a very large oak log and a couple smaller cherry logs. There was enough cherry for four bowls. This was the fourth attempt, and the only one worth a damn -- although, as you can see, it's no good for cereal.

This bowl shows off one of my favorite things about woodturning. When my friend gave me the wood, there was no way to know it contained this interesting inclusion. When I cut into it this afternoon, I saw that a partial ring in the interior had rotted away. Even seeing that, I didn't know exactly what this would end up looking like until I had removed a lot of wood.

Sunday, March 16, 2008

Woodturning #4: Figured Maple Bowl


maple bowl
Originally uploaded by ..Sally..
I bought this piece of figured maple from Rockler a couple of weeks ago when Francis, George, and I drove out their anniversary sale. As far as I can tell, "figured" means that the wood has some sort of irregularity in its grain. This one has a few little dark threads making a cloudy patch (the edge of it is visible on the lower left of this picture), giving a more interesting look to the bowl.

I learn something every time I put wood on the lathe, but I make so many mistakes. For the time being, I've given up trying to make natural-edged bowls from fresh wood -- after a few catastrophic mistakes turned a couple hours of work into firewood. I really need either a class or a mentor.

Saturday, March 08, 2008

More Free Woodturning Videos

I recently pointed out JET Tools' wonderful practice of posting woodturning instructional videos on YouTube.  Here's another treasure trove of woodworking videos that I came across via WoodMagazine.com.  Scroll to the right to find woodturning videos, which are shot from great angles with nice close-ups; you can see exactly how each chisel is engaging as it cuts.  There's a whole lot more than just woodturning material here, but that's what I'm obsessed with at the moment.

Tuesday, February 05, 2008

Woodturning Videos

Here's an example of a company doing the little things right. Jet Tools has posted a number of these woodturning instructional videos on YouTube. They're great because (1) not everyone has time for woodworking classes; and (2) they're available, for free, online. These videos strike me as unusual because copyright holders are so often reluctant to set their creations free in the Internet wilderness. Jet has apparently determined that encouraging the proper use of their tools is more important that wringing a few extra dollars out of the video market.

Isn't it refreshing when a company isn't evil? These days, it seems like the companies that are so eager for your dollars are almost equally eager to sue you for copyright infringement, share your private data, sell you an inferior product (double win for the maker: it's cheaper to build, and you'll have to buy a replacement sooner!), et cetera, et cetera. When I find a company that actually serves its customers, I'm excited to share it with you - the handful of people who visit this blog. That's the motivation for my lengthy Netflix posts. So, good for you Jet Tools. Thanks for the videos.

Friday, November 02, 2007

Woodturning #3 - The Gavel


gavel
Originally uploaded by ..Sally..
One of the most satisfying aspects of woodturning is how quickly a project moves from beginning to end. This little gavel - my first attempt at "spindle" turning, as opposed to "faceplate" turning - took no more than an hour to make. I used a piece of birch that was left over from the table I made last year.

Sally and the kids are in Ft. Worth this weekend, giving me a chance to work on some long-delayed projects at home. This little gavel, in fact, represents procrastination from more important tasks. So, I'm off to Home Depot to buy paint and some other things.

Sunday, September 02, 2007

Woodturning #2


IMG_2785.jpg
Originally uploaded by Sally Carns.
I have some good news and some bad news about this new hobby. The good news is that, thanks to my mom's patronage, I've made a significant upgrade in equipment. Instead of the 40 year-old 12-inch Sears lathe mounted to a piece of plywood, I'm now working on a machine that has a lot more power and stability. What a completely unexpected and amazing gift! Thank you Mom. I will send you many bowls.

The bad news relates to all the wood I cut from that dead tree across the street. Almost all of it is cracked and ruined for turning. It was great wood, but I didn't seal it when I cut it, and it immediately started cracking. The literature that I had read suggested sealing wood blanks with special paint or with wax in order to slow the drying process. Because quick drying causes cracks, you must seal the wood to prevent the cracks.

The other option is to turn the fresh wood immediately, relieving a lot of the internal pressure within the wood, and allowing the finished bowl to deform instead of cracking. I was trying to execute this second option, and I wasn't fast enough.

Lesson learned.

Click through this set and check out the great pictures that Sally took in the garage this evening. I've been able to salvage a few small pieces of the elm, and I've learned a lot from turning them.

Tuesday, August 21, 2007

Woodturning #1


firstbowl-2264.jpg
Originally uploaded by Sally Carns.
I've been curious about woodturning for a long time. The process of chiseling a piece of wood while it spins on a lathe seems like good therapy to me. You can use a lathe to make just about anything that incorporates a round shape, but I'm most interested in bowls right now.

A couple weeks ago, Sally posted a story about the fallen trees in our neighborhood, and her salvaging a 500-pound log of elm wood for me. I checked with the forestry department about safe use and storage of diseased elm (strip the bark and spray with bug killer, if you're interested), and then rented a chainsaw.

Ladies and gentlemen, I'm here to tell you that you cannot have more fun for $30 than slicing up a huge log with a gas-powered chainsaw. I do wish that I'd had a better understanding of the capacity of my lathe before I started cutting, though. I now have a lot of pieces that, although they will technically fit onto my lathe, are too large to safely turn with the ancient Craftsman.

For the last week, I've been chucking up some of the smaller pieces and attempting to make bowls. The mounting method I use is rudimentary -- a steel faceplate screwed into the eventual base of the bowl. That method has the disadvantage of leaving holes in the bottom of my bowl. There are several methods to avoid this, but I'm just focusing on basic cutting techniques for now.

The bowl in this picture is the third piece of wood that I've turned. The first two were relative disasters, so I've already gotten a chuckle out of the woodturning maxim: "turners don't make mistakes, only kindling."

Thursday, July 26, 2007

Finished Kitchen


Mattkitchen.jpg
Originally uploaded by The Gulde Family.
There have been two kitchens under construction around here lately. Here is the smaller one; it is finished.

Since you last saw this kitchen, I've added a plywood back, brass faucet (see inset a), steel-grate oven shelf (b), knobs (c), black grip-tape burners (d), a shelf in the left cabinet, and a few coats of paint and varnish.

This was so much fun to build, and I can only hope that Francis has not outgrown playing with toy kitchens in the time it took to build it.

Sunday, July 08, 2007

Georgie's New Chair


George's New Chair
Originally uploaded by The Gulde Family.
It's a wonderful thing to have a handy husband. Not only do I benefit from having custom built closets, but the kids are beginning to stockpile quite a few heirlooms. Matt is finishing up an adorable little kitchen for Francis and has also made a great table and chairs set. This past weekend, I said, "Matt, I'd really love to have a little chair with arms for George so he doesn't tip over." And a few hours later, he came in from the garage with this. It's perfect. I love it and of course, Georgie does too. Good job sweet husband.

Tuesday, January 23, 2007

Francis's Kitchen


Francis's Kitchen
Originally uploaded by The Gulde Family.
At long last, here is the kitchen that I made for Francis. Even now, it's not quite finished. Actually, it's not even close to finished. Tasks remaining: knobs, shelves, dials, a back, paint/stain. The absence of these things has not seemed to bother Francis, though. As you can see, she has fully stocked the kitchen and is practicing the domestic arts.

I have really enjoyed building this thing, the design and dimensions of which I ripped off of the Land of Nod.

Skip this paragraph if you don't care how it was made. It's 3/4 inch pine, specifically those boards that are made up of several boards glued side-by-side. These are really uniform pieces of wood, which is nice if you don't have a jointer or a surface planer in your shop. I made all of the curved cuts with a hand-held jigsaw, except for one of the sides, which I roughed in with the jigsaw and then finished with a router and cut-off bit (using the side I already cut as a template). All three of the cross members rest in dado channels cut in the vertical sides, but I didn't have the courage not to add screws. Does anyone know if glue would've sufficed? The sink is a dog bowl set into a hole in the countertop. The oven window is plexiglass, and I'd actually like to add an oven light on a toggle switch. I haven't looked to see how that can be done with a battery setup.

Anyway, I'm learning. I've added this picture to a separate "workshop" set on flickr so you can monitor the snail's pace of my progress.

Tuesday, May 02, 2006

Table and Chairs


Table and Chairs
Originally uploaded by The Gulde Family.
Back in February, I started building Francis a table and four chairs. I'm still not finished, but as you can see, I've completed the construction phase of the project. The chairs could use a couple more coats of varnish, and the table hasn't been varnished at all. Still, I'm proud of them and I wanted to share.

This photo set shows some details of the table assembly. I have no independent knowledge that this is a good way to put a table together - I basically copied a table from Francis's daycare. I did broaden the base because the original had a tipping problem. I also added a couple inches to the height.

Special thanks to Pat Babka, who helped cut the tabletop.

Monday, February 27, 2006

Francis in the Workshop

After we went to the zoo on Saturday, and after a nap, Francis came out to check out the progress on her chairs. As you can see, she thought I looked funny in my safety glasses. I took some measurements, so I think the chairs will fit her nicely.

There are a couple of good shots of the chair that I'm using as a model for Francis's chairs. The Roedners have already placed an order for at least one chair, but I would advise them to wait and see how mine turns out before making any down payments.

Having a workshop is fun.

Tuesday, February 07, 2006

Workshop


Workshop
Originally uploaded by The Gulde Family.
One of the great things about living in Oak Park is having our own garage. When we lived in Bucktown, we shared a garage with eleven other cars. Moving here in May, I had bold plans for our new private area.

It's taken me about half a year, but I've finally assembled a workspace out there. I covered the walls with pegboard (bought cheaply from an art student downtown - thus the blue color), set up my dad's workbench, and bought myself a tablesaw.

On Sunday, I began - and finished - my first modest project: this plywood bin. It's two feet long and about four inches deep. The holes allow hanging on pegboard, and the dividers slip in and out of their slots for variable bin size.

Click on the title above to view more pictures of the bin and workshop.

Wednesday, January 25, 2006

Pinewood Derby


I saw this fantastic Pinewood Derby car on BoingBoing today. That's a wireless camera on top, feeding video to a digital video recorder. This car made me think of my dad.

Many of you know that my dad died when I was eight. Most of you don't know that the Pinewood Derby is emblematic of the loss of his influence in my life.

For the uninitiated: the Pinewood Derby is an annual cub scout event in which seven to ten-year-old scouts race little wooden cars that they've built with the help of their parents. Each scout is given a block of wood and some wheels and must build a car conforming to the following specifications:

Width: - 2-3/4" - Length - 7" - Weight - Not over 5 Ounces
Width between wheels - 1-3/4"
Bottom clearance between car and track - 3/8"
On the day of the Derby, scouts line up their cars at the starting line, and gravity takes the shiny cars down a ramp and across a level stretch of track to the finish line.

In 1983, the Pinewood Derby was a day away, and my car was a disaster. Looking back on it, I don't remember exactly what the specific problems were, except that the car was not very close to being finished and the design was rather unenlightened.

I remember perfectly, though, my brother's car - completed a decade earlier with the help of my dad. That car sat on top of the trophy cabinet in our shared bedroom. It was a masterpiece: sleek, blue, fast. They had deftly mounted weights at the front axle - inside the profile of the car, hidden by wood putty - to come right up against the 5 oz. limit. I'm sure that car won the Derby for my brother, and it would have done so with style. Its lines were elegant. The blue finish was silk.

My car, even if I had been able to execute the juvenile design, would have been so far below Jeff's as to be a different species. I understood that, and was ashamed of my effort. I actually thought that my car should compare favorably to the blue ghost my father built with his older son.

The eve of the Pinewood Derby ended in tears, and I gave up. I didn't finish my car that night. I didn't go to the race. I think I quit the scouts soon after.

In the following weeks, I finished my car. It looked like something a nine year-old would make. It's red, with black numbers and a gold arrowhead painted on the hood. Its lines are awkward, and show that the builder did not understand physics, beauty, or the rules of the Pinewood Derby. There are no weights at the front axle, and it's clear that I did not sand the wood before painting the car with flat red house paint.

A year or so ago, Sally and I came across my never-raced Pinewood Derby car. She loved it. In its boxy form and splotchy paint, she saw a little boy's laudable effort to give shape to his imagination. She didn't see the how far it fell short. She loved it even when I explained - in damning detail - how much better Jeff's car was.

In my mind, I know she's right. I can give that fourth-grader credit for his solo effort. In my heart, though, I'm still ashamed of that red piece of crap. It should have been so much better, and more importantly, it should have raced.

What is the measure of the loss of a parent?